
Quick Answer
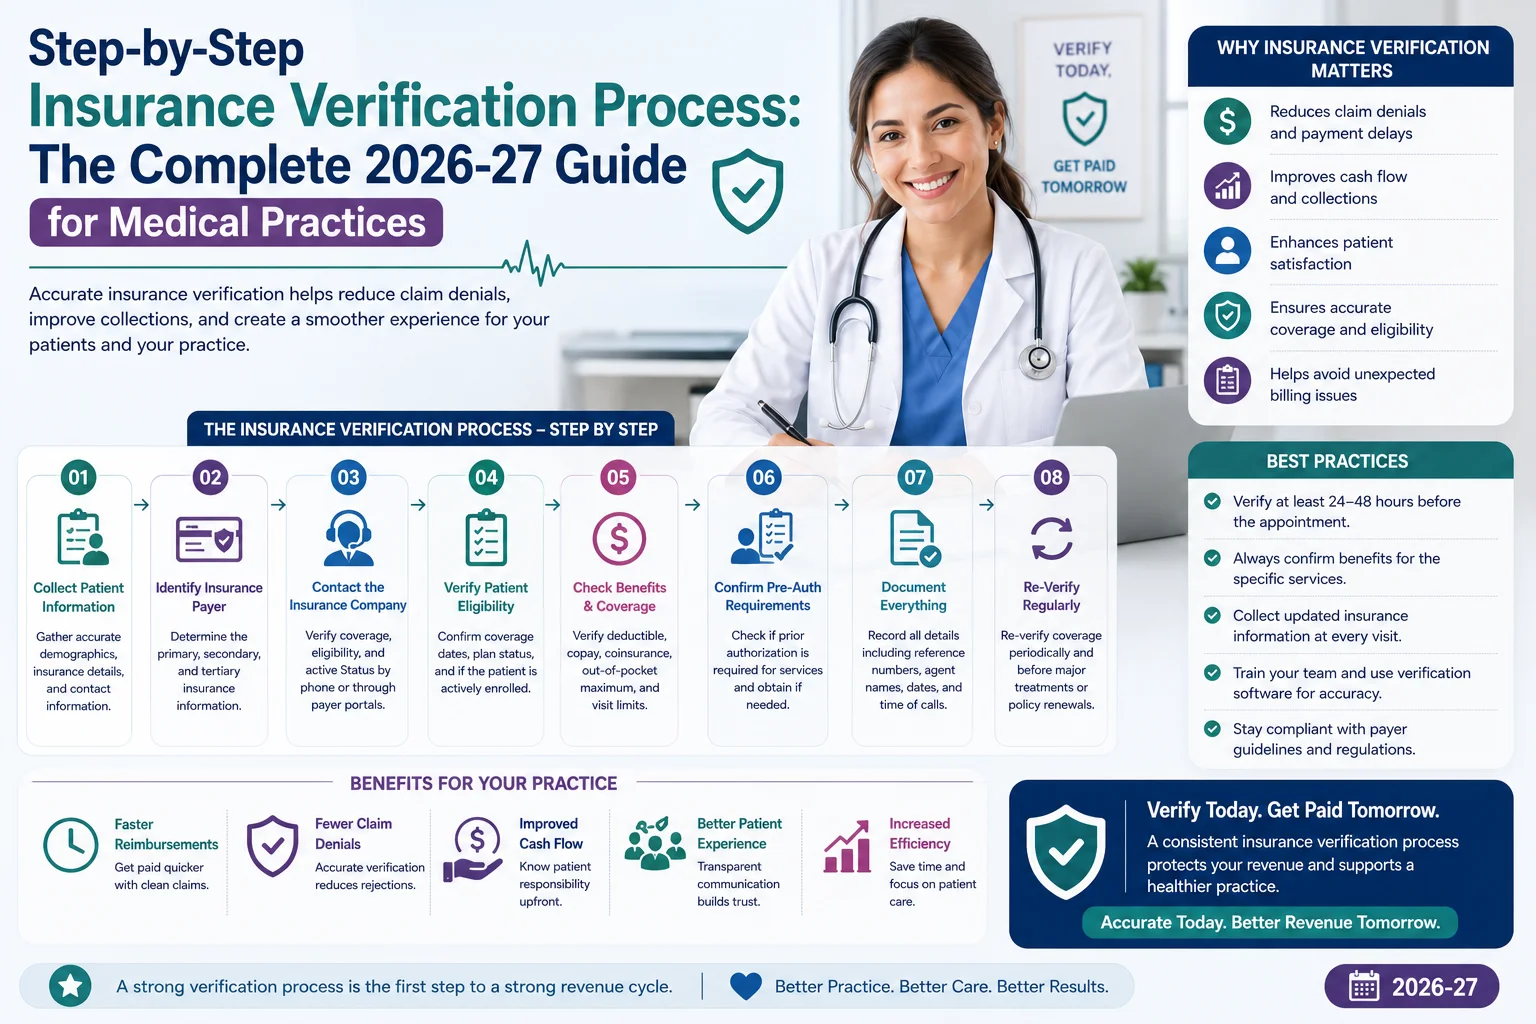
Insurance verification is the process of checking a patient’s insurance coverage, benefits, and financial responsibility before a medical service is provided.It includes a number of steps like collecting patient and insurance details, confirming active coverage, checking deductibles, copays, coinsurance, and out-of-pocket limits, and identifying any prior authorization or referral requirements. It also involves checking other insurance coverage, estimating the patient’s cost, documenting the information, explaining the expected cost to the patient, and rechecking coverage before the appointment.
What Is Insurance Verification in Medical Billing?
Insurance verification is also called eligibility verification or benefits verification. As its name shows, it is the process of verifying or confirming that the patient’s health insurance policy is active and that the specific service being provided is covered under their plan before a patient is seen. It answers three questions a medical billing team needs answered before a claim is ever filed:
- Is the patient’s insurance active on the date of service?
- Does the plan cover the specific service or procedure?
- How much will the patient need to pay and does the service require prior authorization or a referral?
Insurance verification happens at the beginning of the revenue cycle management process, before the appointment is finalized and before any CPT or ICD-10 codes are added. It acts as a first step to make sure the patient’s insurance is valid and the service is covered. When verification is done correctly, it helps prevent claim problems later. If it is skipped or done too quickly, it can lead to denied claims, lost revenue, or unexpected bills for the patient.
Insurance Verification vs. Eligibility, Benefits, and Prior Authorization
Most people misunderstand these terms and use them interchangeably but they mean different things:
- Eligibility verification: Confirms that the patient’s insurance is active and identifies the plan type.
- Benefits verification: Checks details such as deductibles, copays, coinsurance, visit limits, and coverage for a specific service.
- Prior authorization: Confirms whether the insurance company needs to approve a specific procedure or service before it is provided. Accurate insurance verification helps determine whether prior authorization is required.
Why Is Insurance Verification the Foundation of Revenue Cycle Management?
2026-27 industry data shows that eligibility and coverage issues are major causes of claim denials. Incorrect patient information and missed verification can cause problems before a claim is even reviewed. Prior authorization denials are also increasing, often because authorization requirements were missed during verification.
Denied claims take time and money to fix, and some are never resubmitted, leading to lost revenue. It is estimated that each claim costs tens of dollars in administrative rework, which becomes huge when these claim denials increase. Since many denials can be prevented, insurance verification is an important part of the entire billing process.
Not just for claims, verification also helps patients. Giving them an estimated cost before their visit can prevent surprise bills and unpaid balances. It also helps practices collect patient payments more efficiently.
The Step-by-Step Insurance Verification Process
Let’s see the complete workflow used by revenue cycle management teams to verify insurance before a patient is seen. The tools can vary but the process is similar across most medical specialties.
Step 1: Collect Patient and Insurance Information at Scheduling
Insurance verification starts when the appointment is scheduled, not on the day of the visit. Staff should collect:
- Patient’s full name, date of birth, and address (exactly as shown on the insurance card)
- Insurance company name, member ID, and group number
- Subscriber’s name and relationship to the patient
- A copy of the front and back of the insurance card
- Details of any secondary insurance
- The reason for the visit or expected services
Accurate information is important because small mistakes, such as an incorrect policy number or outdated insurance card can lead to claim denials later.
Step 2: Confirm Active Coverage
Once the patient’s information is collected, staff check whether the insurance is active on the date of service. This can be done in three ways:
- Payer portal: Check the insurance company’s provider website.
- Phone verification: Call the insurance company and speak with a representative.
- Electronic verification: Send an electronic eligibility request and receive a response within seconds.
The insurance can show as active, pending, inactive, or require more information. If it is not clearly active, staff should follow up before the patient’s appointment.
Step 3: Verify Plan-Specific Benefits
After confirming the insurance is active, staff checks what the plan covers. This includes:
- Whether the provider and facility are in-network
- Whether the specific service or procedure is covered
- Any visit or annual limits
- Any exclusions related to the treatment or diagnosis
Step 4: Check Patient Financial Responsibility
Next, staff determines how much the patient is required to pay. This includes:
- Deductible: The amount the patient must pay before insurance starts paying.
- Copay: A fixed amount the patient pays for a visit or service.
- Coinsurance: The percentage of the cost the patient pays after meeting the deductible.
- Out-of-pocket maximum: The most a patient has to pay for covered services during the plan year before the insurance plan pays 100% of eligible costs.
Step 5: Identify Prior Authorization and Referral Requirements
This is an important step that can turn into high risk if you skip because many insurance plans require prior authorization or a referral for certain services, such as imaging, surgery, and specialty care. If these requirements are missed, the claim can be denied and also very difficult to appeal after the fact. Some HMO and Medicaid plans also require a referral from a primary care provider before a specialist visit will be covered.
At this step, staff should confirm:
- If the planned service needs prior authorization
- If a valid referral is on file
- How long the authorization process will take so it can be completed before the appointment
Step 6: Check Coordination of Benefits (COB)
If a patient has more than one active insurance plan, staff need to determine which one is primary and which one is secondary. This is common with dependents, Medicare and Medicaid, or coverage through a spouse. Billing the wrong insurance first can easily lead to rejected claims. Insurance companies follow specific Coordination of Benefits (COB) rules to decide which plan should pay first, such as the birthday rule for dependent children.
Step 7: Document Everything in the Practice Management System
All insurance information should be recorded in the patient’s chart or practice management system before the visit. This includes the policy status, deductible, copay, authorization number, insurance order, and payer representative’s name or reference number.
This documentation fulfills two main things: one is it helps staff collect the correct payment at check-in and the other is it gives the billing team a record if the claim is later denied or questioned.
Step 8: Communicate the Estimate to the Patient
Before or at the time of service, tell the patient how much they need to pay. This helps prevent billing disputes and makes it easier to collect the patient’s payment at the time of the visit rather than through a billing statement weeks later. For uninsured or self-pay patients, practices should also follow applicable Good Faith Estimate requirements under the No Surprises Act.
Step 9: Re-Verify Close to the Date of Service
Insurance coverage can change between scheduling and the appointment. A patient can change plans, lose coverage, or switch insurance companies. For this reason, practices should check the patient’s insurance again 24–72 hours before the appointment, not just at initial scheduling. This helps catch changes early and prevent billing problems. Rechecking insurance helps catch coverage changes and prevents problems that can happen when old information is used.
Manual vs. Electronic Verification: How the EDI 270/271 Transaction Works
There are two fundamentally different ways to perform Step 2 and Step 3 above. You can do it manually or electronically through a standardized data exchange.
Manual verification means calling the insurance company or checking its provider portal one at a time. It can provide detailed information but it takes more time and becomes difficult when a practice handles hundreds of patients a day across a dozen different payers.
Electronic verification relies on a HIPAA-mandated data exchange standard and uses the X12 270/271 system to check insurance information automatically.
- The provider or clearinghouse sends a 270 eligibility inquiry with the patient’s insurance details.
- The insurance company sends back a 271 eligibility response, usually within seconds.
- The response can show coverage status, effective dates, copays, coinsurance, deductible information, and authorization requirements.
Because the 271 response is in a standard format, it can be added directly to the practice management system without manual data entry. Electronic verification is faster and can be more accurate than manual checks.
However, some insurance companies can provide incomplete information electronically. In these cases, billing teams need to use a phone call or payer portal, especially for complex plans or out-of-network services.
What Information Should Be Verified and Why Each Data Point Matters
Policy status: Confirms whether the insurance is active.
Effective and termination dates: Confirms that coverage is valid on the date of service.
Plan type: Shows the plan’s network, referral, and authorization rules.
Deductible: Shows how much the patient must pay before insurance starts paying.
Copay: Shows the fixed amount the patient needs to pay.
Coinsurance: Shows the percentage of the cost the patient must pay.
Out-of-pocket maximum: Shows how close the patient is to reaching their yearly payment limit.
Prior authorization: Shows whether the service needs approval before it is provided.
Referral requirement: Shows whether a PCP referral is needed for a specialist visit.
In-network status: Confirms whether the provider is in-network.
Coordination of benefits: Shows which insurance should be billed first when the patient has multiple plans.
Common Insurance Verification Mistakes That Cause Denials
- Checking insurance only once: Coverage can change before the patient’s appointment.
- Only checking if the plan is active: An active plan can still not cover the specific service.
- Skipping prior authorization checks: Some services require approval even if they seem routine.
- Not checking multiple insurance plans: Billing the wrong insurance first can cause claim rejection.
- Relying only on electronic verification: Electronic information can sometimes be incomplete, so a phone call or portal check can be needed.
- Not documenting verification: Without proper records, it can be harder to handle denied claims or appeals.
How Revantage Billing Handles Insurance Verification
At Revantage Billing, insurance verification is more than a one-time check. Our team of medical billing experts verifies each patient’s insurance when the appointment is scheduled and checks it again before the visit.
Our team uses electronic eligibility checks and contacts insurance companies directly when more information is needed. We verify important details such as deductibles, copays, coinsurance, prior authorization, and other coverage requirements.
This information is documented clearly to support clean claims and give patients a better idea of their expected costs. This helps reduce denials, speed up payments, and prevent surprise bills.